This document describes the customization you can add to a component and which will be visible during the installation with Installer.
You need to remember that only the customizations of the root component will be visible during the installation.
|
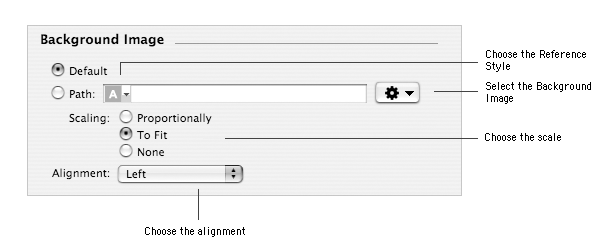
By default, when you install a package or a metapackage, Installer displays the X of the Mac OS X logo in the background (on Mac OS X 10.4, it is now a big application icon). You can change this image and use a custom one.

To use the default background image:
| 1 | Select the component in the Packages & Metapackages list. |
| 2 | Choose View > Documents. |
| 3 | Select the button labeled Default. |
To use a custom background image:
| 1 | Select the component in the Packages & Metapackages list. | ||
| 2 | Choose View > Documents. | ||
| 3 | Select the button labeled Path:. | ||
| 4 | Choose Choose… from the Action pop-up menu. | ||
| 5 | Select the image to use as the background image.
| ||
| 6 | Click Choose. |
To change the background image scale:
| 1 | Select the component in the Packages & Metapackages list. |
| 2 | Choose View > Documents. |
| 2 | Select the button labeled:
|
To change the background image alignment:
| 1 | Select the component in the Packages & Metapackages list. | ||
| 2 | Choose View > Documents. | ||
| 3 | Choose the alignment from the Alignment pop-up menu.
|
By default, when you install a package or a metapackage, Installer displays the following welcome message: "Welcome to the Mac OS X Installation Program. You will be guided through the steps necessary to install this software.". You can change this message to use a more appropriate one for your component. You can use the same message for all languages or you can localize it.
Important: The welcome message is displayed in a non scrollable view.

To use the default welcome:
| 1 | Select the component in the Packages & Metapackages list. | ||
| 2 | Choose View > Documents. | ||
| 3 | Select the button labeled Default.
|
Note: The welcome will be displayed in the language of the user.
To use a custom welcome:
| 1 | Select the component in the Packages & Metapackages list. | ||
| 2 | Choose View > Documents. | ||
| 3 | Select the button labeled Path:. | ||
| 4 | Choose Choose… from the Action pop-up menu. | ||
| 6 | Select the text document to use for the welcome message.
| ||
| 7 | Click Choose. |
Note: By default, the welcome message will be the same for every language. To display a localized message, you need to add localized welcome message.
To add a custom welcome localization:
| 1 | Select the component in the Packages & Metapackages list. |
| 2 | Choose View > Documents. |
| 3 | Choose Add Localization… from the localization pop-up menu. |
| 4 | Type the name of the localization and click Add. |
| 5 | Select the button labeled Path:. |
| 6 | Choose Choose… from the Action pop-up menu. |
| 7 | Select the text document to use for the welcome message. |
| 8 | Click Choose. |
To edit a custom welcome localization:
| 1 | Select the component in the Packages & Metapackages list. |
| 2 | Choose View > Documents. |
| 3 | Choose the localization to remove from the localization pop-up menu. |
| 3 | Make your changes. |
To remove a custom welcome localization:
| 1 | Select the component in the Packages & Metapackages list. | ||
| 2 | Choose View > Documents. | ||
| 3 | Choose the localization to remove from the localization pop-up menu. | ||
| 4 | Choose Remove… from the localization pop-up menu. | ||
| 5 | Click Remove.
|
Installer can display a readme message after the welcome message. This message can be printed or saved by the user. By default, no readme messages is displayed. You can use the same message message for all languages or localize it.

To display no readme messages:
| 1 | Select the component in the Packages & Metapackages list. | ||
| 2 | Choose View > Documents. | ||
| 3 | Select the button labeled None.
|
To display a custom readme message:
| 1 | Select the component in the Packages & Metapackages list. | ||
| 2 | Choose View > Documents. | ||
| 3 | Select the button labeled Path:. | ||
| 4 | Choose Choose… from the Action pop-up menu. | ||
| 6 | Select the text document to use for the readme message.
| ||
| 7 | Click Choose. |
To add a custom readme localization:
| 1 | Select the component in the Packages & Metapackages list. |
| 2 | Choose View > Documents. |
| 3 | Choose Add Localization… from the localization pop-up menu. |
| 4 | Type the name of the localization and click Add. |
| 5 | Select the button labeled Path:. |
| 6 | Choose Choose… from the Action pop-up menu. |
| 7 | Select the text document to use for the readme message. |
| 8 | Click Choose. |
To edit a custom readme localization:
| 1 | Select the component in the Packages & Metapackages list. |
| 2 | Choose View > Documents. |
| 3 | Choose the localization to edit from the localization pop-up menu. |
| 3 | Make your changes. |
To remove a custom readme localization:
| 1 | Select the component in the Packages & Metapackages list. | ||
| 2 | Choose View > Documents. | ||
| 3 | Choose the localization to remove from the localization pop-up menu. | ||
| 4 | Choose Remove… from the localization pop-up menu. | ||
| 5 | Click Remove.
|
When a package or a metapackage is being installed, Installer can ask the user to agree to an End User License Agreement (EULA) so that he/she can perform the installation. The user license can be printed or saved by the user. If multiple localizations of the license are available, they are all accessibles to the user. By default, no license is displayed.

To display no licenses:
| 1 | Select the component in the Packages & Metapackages list. | ||
| 2 | Choose View > Documents. | ||
| 3 | Select the button labeled None.
|
To display a user license defined in a text document:
| 1 | Select the component in the Packages & Metapackages list. | ||
| 2 | Choose View > Documents. | ||
| 3 | Select the button labeled Path:. | ||
| 4 | Choose Choose… from the Action pop-up menu. | ||
| 6 | Select the text document to use for the user license.
| ||
| 7 | Click Choose. |
To display a user license based on a license template:
| 1 | Select the component in the Packages & Metapackages list. | ||
| 2 | Choose View > Documents. | ||
| 3 | Select the button labeled Template:. | ||
| 4 | Choose the license template from the Template pop-up menu.
|
To add a license localization:
| 1 | Select the component in the Packages & Metapackages list. |
| 2 | Choose View > Documents. |
| 3 | Choose Add Localization… from the localization pop-up menu. |
| 4 | Type the name of the localization and click Add. |
| 5 | Configure the license settings as needed. |
To edit a license localization:
| 1 | Select the component in the Packages & Metapackages list. |
| 2 | Choose View > Documents. |
| 3 | Choose the localization to remove from the localization pop-up menu. |
| 3 | Make your changes. |
To remove a license localization:
| 1 | Select the component in the Packages & Metapackages list. | ||
| 2 | Choose View > Documents. | ||
| 3 | Choose the localization to remove from the localization pop-up menu. | ||
| 4 | Choose Remove… from the localization pop-up menu. | ||
| 5 | Click Remove.
|
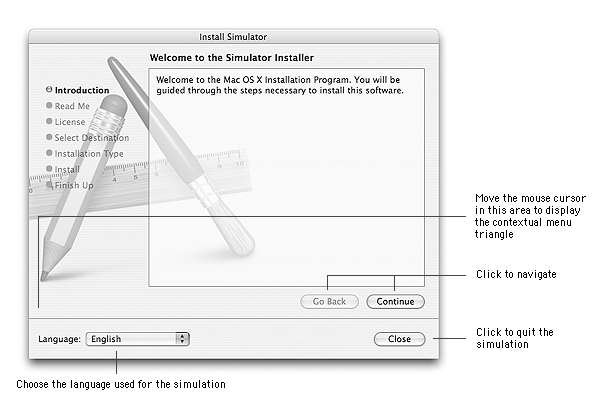
You can preview the customizations you added to the component with the installation simulator. It will show you the three first steps of an installation as if you were running Installer. Moreover, you will be able to select the language and to change the alignment or scale of the background image.

To run a simulation:
| 1 | Select the component in the Packages & Metapackages list. |
| 2 | Choose Project > Preview. |
To change the alignment or scale of the background image:
| 1 | Cliquez sur le menu local de configuration de l'image de fond dans la fenêtre du simulateur. |
| 2 | Choose the alignment or scale from the contextual menu. |
To quit the simulator:
| 1 | Click Close. |
| 2 | If you changed a setting of the background image, a dialog will pop-up and ask you to confirm the modifications. |